Royal Wedding Bracelet Pattern

body {visibility: hidden; display: none;}

Brac277photo_w

You can sparkle at the wedding in this beautiful simple to make bracelet. If you don’t have any of the Cathedral beads you can also use Swarovski crystals or fire-polished crystals. You will still sparkle when you wave.

B0277_supplies

This Pattern is Free here on my Blog.
To Purchase a Downloadable PDF: Click HERE

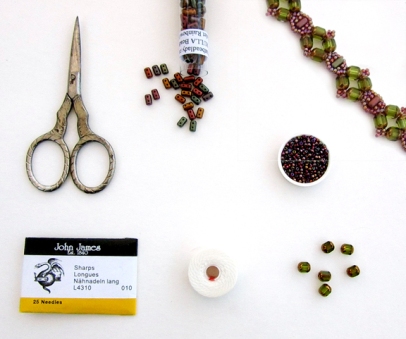
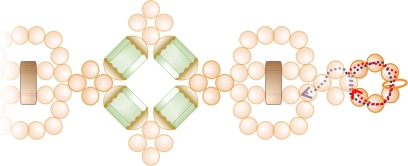
A = Miyuki 11° SEED bead, 44*
B = 4mm Czech Cathedral dome beads (or 6mm crystals of any kind), 4*
C = Czech Rulla beads, 1*

*Bead Counts are per repeat, repeat is approximately 3/4″

Start by waxing and stretching your thread, use Nymo D or C-Lon & a #11 or #12 beading needle. I used Fireline 6lb. crystal.  Tie in a “stopper” bead, leaving about an 12″ tail and begin at step #1.

Brac277_1

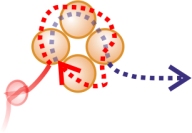
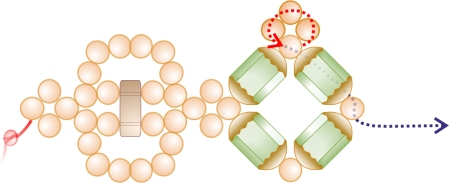
1. Pick up 4A, go with thread forward through the 1st through 3rd A beads just added.

Brac277_2

2. Pick up 2A, 1C, 5A, go with thread right to left through the bottom hole of the C bead just added.

Brac277_3

3. Pick up 2A, go with thread up through the 3rd A bead added in step #1, and left to right through the 1st A bead added in step #2.

Brac277_4

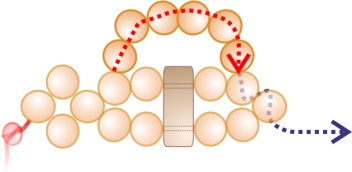
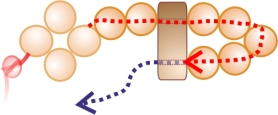
4. Pick up 6A, go with thread forward through the 2nd and 3rd A beads (of the 5A) added in step #2.

Brac277_5

5. Pick up 3A, go with thread forward through the 3rd and 4th A beads (of the 5A) added in step #2.

Brac277_6

6. Pick up 6A, go with thread right to left 2nd A bead, step #3. Continue with working thread by following the thread path in the illustration, coming out with thread up through the 2nd A bead added in step #14.

Brac277_7

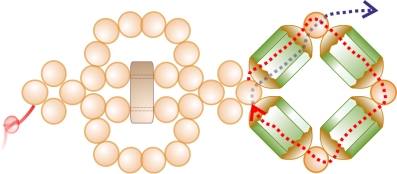
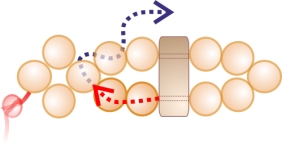
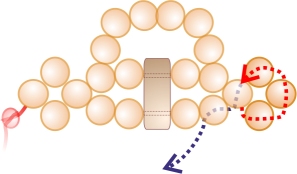
7. Pick up 1B, 1A, 1B, 1A, 1B, 1A, 1B, go with thread up through the 2nd A bead added in step #5, and forward through the 1st B bead and the 1st A bead just added in this step.

Brac277_8

8. Pick up 3A, go with thread forward through the 1st A bead, the 2nd B bead and the 2nd A bead added in step #7

Brac277_9

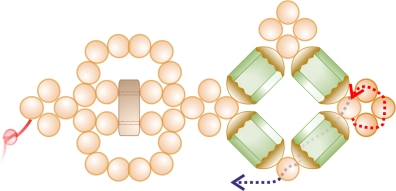
9. Pick up 3A, go with thread forward through the 2nd A bead, the 3rd B bead and the 3rd A bead added in step #7.

Brac277_10

10. Pick up 3A, go with thread forward through the 3rd A bead and the 4th B bead added in step #7. Continue with working thread by following the thread path in the illustration, coming out with thread up through the 2nd A bead added in step #9.

Brac277_11

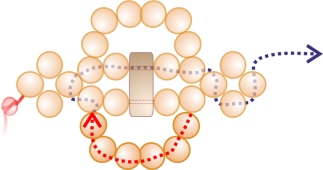
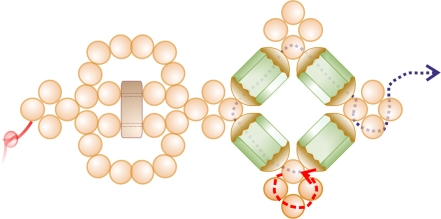
11.  Pick up 2A, 1C, 5A, go with thread right to left through the bottom hole of the C bead just added.

Brac277_12

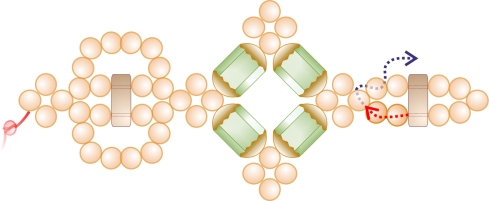
12. Pick up 2A, go with thread up through the 2nd A bead added in step #9, and left to right through the 1st A bead added in step #11.

Brac277_13

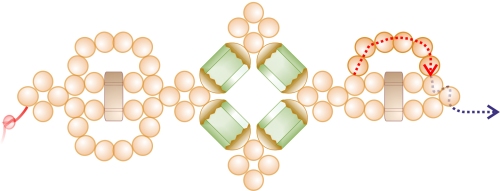
13. Pick up 6A, go with thread forward through the 2nd and 3rd A beads (of the 5A) added in step #11.

Brac277_14

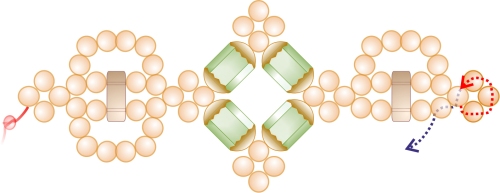
14. Pick up 3A, go with thread forward through the 3rd and 4th A beads (of the 5A) added in step #11.

Brac277_15

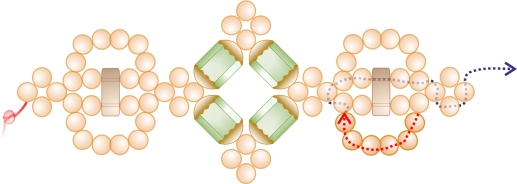
15. Pick up 6A, go with thread right to left through the 2nd A bead, step #12. Continue with working thread by following the thread path in the illustration, coming out with thread up through the 2nd A bead added in step #14.

Brac277_16

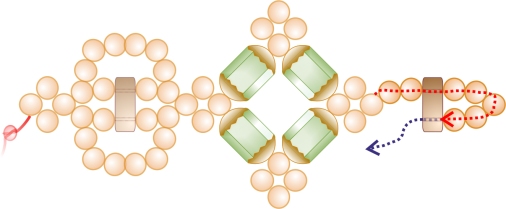
16. Continue by repeating steps #7 through #15 until the necklace is the length that you would like.

Brac277_17

17. To add clasp, pick up 3A, clasp, 3A, go with thread up through 1 A bead in bracelet. Continue with thread around through the clasp beads several times for strength. Weave the working thread into the bracelet and end. Repeat the clasp directions in the same manner at the other end of bracelet after removing the stopper bead.


Royal Wedding Bracelet Pattern, B0277
http://www.SandraDHalpenny.com
Sandra D. Halpenny © 2018 All rights reserved
Canadian Intellectual Property Office. This pattern may not be copied or distributed in any way without the express written permission of the author. The purchaser of this pattern may use the finished piece for personal use and for selling at arts and crafts shows, etc. No mass production of this design is permitted without permission from the author.

Crystal Garden Bracelet Pattern

Teal Lace Bracelet Pattern

Oval Pearl Bracelet Pattern
//pagead2.googlesyndication.com/pagead/js/adsbygoogle.js

(adsbygoogle = window.adsbygoogle || []).push({});

Snowflake #7 Ornament Pattern


It’s that time of year again when the snowflakes will start falling. I think these are a lot more fun when you have snowflakes all over the house. What do you think? This pattern originally appeared in Bead & Button magazine in 2006.

The Pattern is Free on this Website.
To Purchase a Downloadable PDF: Click HERE


Beads needed
11/0 seed bead, White
4mm Crystals AB

R = Round
Rounds start at the Red dot ●

Start by waxing and stretching your thread. Use Fireline*, Nymo D or C-Lon and
an #11 or #12 beading needle. Tie in a “stopper” bead, leaving about a 8-10”
tail and begin at step #1. I like using Fireline® fishing line, too. The 4lb
and 6lb Crystal for bead weaving works best.


Round 1
Pick up 12 seed beads; go with thread through the 1st seed bead. Continue with thread forward through all 12 beads again, coming out with thread at the 1st bead added.


Round 2
a) Pick up 3 Seed beads, skip over 1 bead and go with thread through the next seed bead in R1.
b) Repeat (a), 5 times around R1.
c) Continue with thread forward through the 1st and 2nd seed beads added in the first repeat of (a).

Round 3


a) Pick up 3 seed beads; go with thread forward through the 2nd and 3rd seed beads in R2.
b) Pick up 5 seed beads; go with thread down through the 1st seed bead added in this step and forward through the next 1st and 2nd seed beads in R2a.
c) Continue R3, by repeating steps (a and b), 5 more times around
d) Continue with thread forward through the 2nd bead, R2a and the 1st and 2nd beads added in the first repeat of (a), this round.
Round 4
a) Pick up 6 seed beads, 1
crystal, go with thread around the thread in R3, between the 3rd and
4th seed beads, R3b. Continue with thread up through the crystal
just added.

b) Pick up 6 seed beads, go
forward with thread through the 3rd seed bead, R3a. Continue with
thread up through the 6th seed bead just added in this step.
c) Continue
R4, by repeating steps b and c, 4 more times.
d) Pick up 5
seed beads, 1 crystal, go with thread around the thread in R3, between the 3rd and 4th seed beads, R3b. Continue with thread up through the crystal.Pick up 5 seed beads, go with thread down through the 1st seed bead added in (a), this R, the 3rd seed bead, R3a and up and forward through the 6 seed beads added in (a), this R.
Round 5 
a) Pick up 1 seed bead; go with thread forward through the 1st, 2nd and 3rd seed beads, R4b.
b) Pick up 6 seed beads; go with thread forward through the 3rd, 4th and 5th seed beads, R4c.
c) Repeat (a and b) around 5 more times.
d) Continue Round 5, by repeating steps (a and b), 5 more times around. Continue with thread forward through the seed bead added in the first repeat of (a), this R.

Round 6
a) Pick up 5 seed beads; go with thread forward through the 1 seed bead added in R5a, the 1st, 2nd and 3rd seed beads, R4b, and up through the 1st, 2nd and 3rd seed beads, R5b.
b) Pick up 1 crystal and 5 seed beads, go with thread forward through the 2nd seed bead just added in this step.
c) Pick up 1 seed bead; go with thread down through the 4th, 5th and 6th seed beads, R5b, and the 4th, 5th and 6th seed beads, R4a.
d) Repeat steps (a, b and c), around 5 more times. Weave the working thread into the snowflake and end.

Making Hangers for your Snowflake

1. Make it with beads, make a loop with as many beads as you would
like,

2. or use a piece of fishing line, making it invisible with
mono-filament,

3. or a piece of pretty ribbon. Add ribbon after your snowflake is
stiffened.

Finishing

After the snowflake is complete, you can stiffen it with SC Johnson Floor Finish.

It is a great stiffener, it stays clear even on the crystals. Test it first if you use seed beads with dyed colors to make sure the floor finish doesn’t remove the colors.

Pour enough of the finish into a small container that is wide enough for the ornament.

Float the ornament into the Future and push it around a bit with your finger. (After I am done with the floor finish, I use a funnel and pour the extra back into the bottle)

Take the ornament out and blot both sides with a paper towel.

Put the ornament on a piece of wax paper, shape and flatten it and let it remain on the wax paper to dry. (If you use plastic-wrap, the beads can stick a bit to the wrap, so it needs to be moved around a bit to prevent this from happening.) If your ornament needs a little extra flattening, use two pieces of wax paper and sandwich your ornament in between; put a book on top of the wax paper for about an hour.

Take the book and the top piece of wax paper off the ornament and let dry overnight on the bottom piece of wax paper.

Sandra D. Halpenny © 2005 – 2018 All rights reserved, This pattern may not be copied in any way without the express written permission of the author.


Snowflake #97 Ornament Pattern


Snowflake #109 Ornament Pattern


Snowflake #108 Ornament Pattern


Snowflake #107 Ornament Pattern